-
Deployment
-
Administrative Guide
-
- AWS S3 Storage Configuration using Access and Secret keys
- AWS S3 Storage Configuration using IAM role
- Google Storage Configuration using JSON Authentication Key
- Azure Blob/File Storage Configuration using Access Keys
- Backblaze B2 Storage Configuration using Access and Secret Keys
- DigitalOcean Storage Configuration using Access and Secret Keys
- Oracle Storage Configuration using Access and Secret Keys
-
-
Tutorials
- Quick Start
- AWS S3 File Sharing With Password Protection
- Google Cloud Storage Integration
- SSO for Admin Console using IAM Identity Center
- SSL and Load balancer for NirvaShare on AWS
- SSO for AdminConsole using Azure ActiveDirectory
- SSL Using Nginx Proxy Manager
- How to Share and Manage File Access from AWS S3, Azure Blob with Salesforce Users
- Configure SSO for Admin Console using Google Workspace as Identity Provider
- Share Azure Blob Files with ActiveDirectory Users using SSO
- S3 File Sharing with Okta Users
-
Troubleshoot
Settings
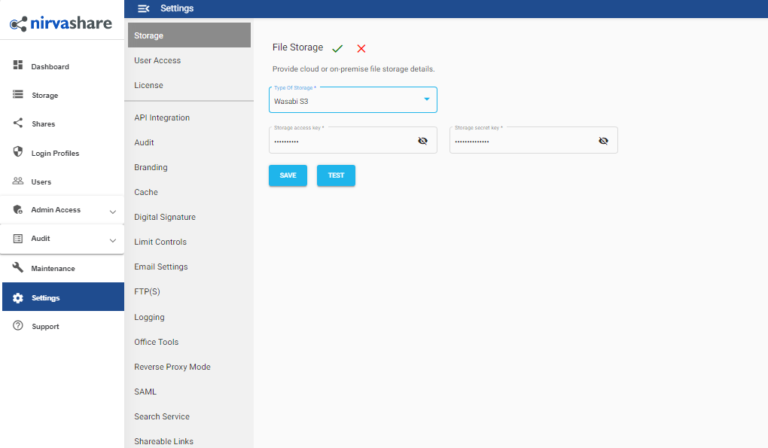
Most of the common administrative settings can be found under Settings tab. Admin or delegated admin users having full access only will be able to modify settings. Each of the settings under this section is explained in detail.

Storage credentials
Storage configuration is the first step to begin with and storage can be a pointed to your existing cloud based or on-premise storage types. Each storage type requires respective credentials to access the storage and make sure you have handy before starting the configuration.

Select your Object Storage provider from the given list of Storage providers. We support below storage types.
- AWS S3
- Azure Blob
- Azure File Shares
- Backblaze B2 Cloud Storage
- DigitalOcean Spaces, E2E
- Google Cloud Storage
- Linode Object Storage
- MinIO,
- Oracle Cloud Storage
- S3 Compatible
- SFTP
- Vultr Object Storage
- Wasabi S3.
To point to your existing file storage, select the storage type and provide the necessary credentials. After saving the details, you’re all set to access files and create shares from your cloud storage. To know more on how to configure some of above storage, you can refer to Blogs.
User Application/File Server URL
NirvaShare is bundled with two applications, one for administrative console and other for user facing application. User application contains components for file sharing and authentication.

If you are testing without domain name, use the IP address of the user application. For example http://10.141.41.9:8081
For production deployment, it is recommended to use proper domain name with SSL.
This will be the base URL for the Share link that you create and share files with users.
Default Login Profile
Multiple Shares can be created with different authentication mechanism and each of these shares will have unique URL while sharing files with users. However, it is also possible to set a default login profile for the user application with just domain name without any addition parameters. For example like https://files.yourdomain.com
When user opens the user application domain name without a full Share URL, a default login profile is prompted based on the selection made here.

- Choose the type of login profile, either External SSO or OTP based. Select None, If you do not want to have a default login profile for the user application.
- Based on the above selection, list of associated login profiles will be listed, select one from the list and save it.
- This will be the default authentication mechanism for the user app default home.
- Users will have access to all the Shares associated with this login profile after getting authenticated.
Audit notifications
The administrator can be instantly notified about events such as successful login, logout, creation of folder , deletion of files/folders, etc., for compliance and security purposes.
Mention email addresses with comma separated. Example: [email protected], [email protected]

- To use this feature, make sure email server details are provided in next section.
Email server details
In order to send emails for notifications, sharing and other purposes, we need to configure the details of email server.

- Provide the details of the email server such as the email host, port number, reply to address, from address, etc, to allow email communications and notifications.
- Enable the SSL option and Start TLS option for establishing encrypted and secure connection.
- On setting the details and saving it, you will now will be able to share files/folder with email, receive notifications and OTP tokens through email.
Organization details
When login profiles created based on external identity providers, make sure you provide organizational details which is required during auth integration.

- Set the organization details like the name, contact email address, phone number and location of the organization.
- This information will be used during SAML assertion while integrating with the external identity provider.
Set-up email template
Email templates are used for all email communication from NirvaShare. The emails sent while sharing files/folders, OTP token, events notification, etc can be customized based on our requirement. The template has subject and body of the emails which can be modified to your need.

- Select the template for which you would like to customize the email content.

Edit the subject and body of the email template based on your requirement. Any of below macros can be used in your email to substitute its value.
- $$_USERNAME_$$ – Form based login profile username for the Share.
- $$_PASSWORD_$$ – Form based login profile password for the Share.
- $$_SHARE_URL_$$ – The URL link of the Share.
- $$_FILE_TYPE_$$ – Indicates whether the shared resource is file or folder.
- $$_COMPANY_$$ – Name of your company
- $$_OTP_TOKEN_$$ – Dynamically generated OTP token.
Session Timeout
Browser session timeout can be set to both Admin console and User application. When users uploads or downloads large files which may take more time, in those cases it is advisable to keep this timeout higher so to prevent any server errors occurring due to session timeout.

Branding - Logo
The user facing application can be customized to have your brand logo on the login screen and on the homepage. By default, NirvaShare logo will be used in the absence of your company logo or when license is expired.

- Upload the image of the brand logo that will appear in the user application. File type should be of PNG.
Branding - header color
The user facing application can be customized to have theme color that goes with your logo and branding. By default, it will use WHITE color in the absence of custom brand color or when license is expired.

- Click on the palette icon which opens the color picker and choose the color or you can type out the hex code of your color choice.
- The set branding header color will be the color of the header and footer in the user application.
Suspend user-app
Access to User application can be temporarily suspended if required. Whenever you may require and undergo periodic maintenance, during such time the users must be prevented from accessing the application.

- By enabling this, the access to the user application is temporarily suspended.
- After suspending the access and saving it, when users try to access the user application, it will re-direct them to an access denied page.
Enable proxy mode
When admin make file operations such as upload or download, files can be directly transferred from browser to storage using pre-signed urls to increase upload or download speed efficiency, otherwise data always flow thru NirvaShare.
Enable Reverse Proxy Mode when you require file upload or download to go through NirvaShare instead of using pre-signed URL

- By enabling the proxy mode and saving it, the file is uploaded or downloaded will use reverse proxy mode in AdminConsole.
- Please note that, to use non proxy mode, you may have to allow CORS at your storage configuration.
Digital signature certificate
Shared PDF documents can be digitally signed automatically when user access it. In each Share, you need to enable this feature to trigger the digital signing of PDF documents.

- Configure the digital signature details such as the X509 Certificate, Private key and the TSA URL.
- Provide the certificate details, that will be used for signing the pdf documents while sharing files.
- This is applicable only when signing option is enabled while creating or editing the share.
Clear Cache
Admin console memory cache is invalidated to let re-initialization of fresh data. It also clears node lock due to the license limit.

Set-up License
When blank, FREE license is applicable and has limited essential features. To enable all features, you will need Trial or Full license key. To get the license key, please contact at HERE

- Enter your license key and save it to avail all the features of NirvaShare available for your license.
- On expiration, it falls back to free license.