Installation in AWS using Cloud Formation
Cloud Formation allows to automate AWS resources creation and deployment in a simplified manner. NirvaShare deployment can also be done using Cloud Formation and in this document, we will discuss it in detail.
Installation
To install NirvaShare using Cloud Formation, login to AWS console and open the Cloud Formation service. Create a new Stack and select option to upload a template file as shown below.
Note: Please note that NirvaShare can be installed directly from the AWS Marketplace http://aws.amazon.com/marketplace/pp/B09YHRWKJB
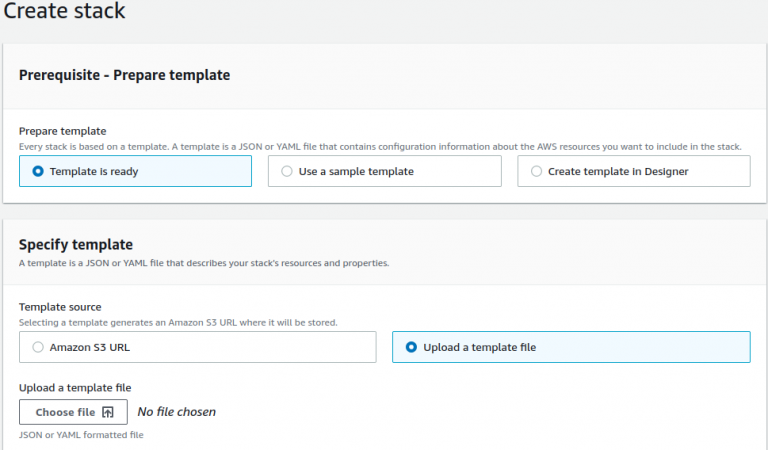
For the template file, please create a new file in your local system using the below content and make sure YAML format is maintained. Select the saved file to upload.
AWSTemplateFormatVersion: "2010-09-09"
Resources:

  ## Security group for NirvaShare WebInstance enabling port 8080 and 8081
  ## Port 22 for console access
  WebSecurityGroup:
    Type: AWS::EC2::SecurityGroup
    Properties:
      GroupDescription: NirvaShare security group
      GroupName: WebSecurityGroup
#      VpcId: vpc-abc01234
      SecurityGroupIngress:
        -
          IpProtocol: tcp
          FromPort: 22
          ToPort: 22
          CidrIp: 0.0.0.0/0
        -
          IpProtocol: tcp
          FromPort: 8080
          ToPort: 8080
          CidrIp: 0.0.0.0/0
        -
          IpProtocol: tcp
          FromPort: 8081
          ToPort: 8081
          CidrIp: 0.0.0.0/0

  ## EC2 Instance
  WebInstance:
    Type: AWS::EC2::Instance
    Properties:
      BlockDeviceMappings:
        -
          DeviceName: "/dev/sda1"
          Ebs:
            VolumeSize: 40
            VolumeType: gp2
      InstanceType: t2.medium
      ImageId: ami-04505e74c0741db8d
#      KeyName: my-key
      Monitoring: true
      SecurityGroupIds:
        - !Ref WebSecurityGroup
      UserData:
        Fn::Base64:
          !Sub |
            #!/bin/bash
            curl -s https://raw.githubusercontent.com/nirvashare/nirvashare/main/linux/ubuntu/vendors/aws/install_nirvashare.sh -o ns_install.sh && bash ns_install.sh && rm -f ns_install.sh
      Tags:
        -
          Key: Name
          Value: NirvaShare
Provide a stack name and proceed with the installation with defaults. This cloud Formation script will create a EC2 instance and subsequently will also install and configure NirvaShare.
Further reference – Sharing Files with External users