Configure SSL for NirvaShare Using Nginx Proxy Manager
In this document, we will walk through the steps to install Nginx Proxy Manager in a Docker container and configure it to enable SSL for NirvaShare services.
Nginx Proxy Manager provides a simple, web-based interface for managing reverse proxies with SSL support, making it an ideal choice for securing NirvaShare deployments.
To learn more about Nginx Proxy Manager, please refer to the following link
Prerequisites
Before proceeding with the installation and configuration of Nginx Proxy Manager for NirvaShare, ensure the following:
NirvaShare Installation
NirvaShare should be installed on a Linux environment—either on the cloud or on-premises.Open Required Ports
Ensure that ports 81 and 443 are open in your firewall or security group settings.Domain Configuration
You must have two domain names (one for the Admin Console and one for the User Application), both pointing to the public IP address of the server where NirvaShare is installed.Example:
admin.yourdomain.comfor the Admin Consoleshare.yourdomain.comfor the User Application
SSL Certificate
If you are using a custom SSL certificate, ensure it is issued by a valid Certificate Authority (CA) and covers both domain names.
Alternatively, you can use a free SSL certificate from Let’s Encrypt.
Nginx Proxy Manager provides built-in support for obtaining and renewing Let’s Encrypt certificates, which will be covered in the following sections.
Installation
To install Nginx Proxy Manager as docker service, follow the below steps.
- SSH to Linux machine where NirvaShare is installed, run the below commands which will install the latest Nginx Proxy Manager server.
sudo su root
cd /var/nirvashare
wget https://raw.githubusercontent.com/nirvashare/nirvashare/main/docker/common/install-proxy.yml
docker-compose -f /var/nirvashare/install-proxy.yml up -d
Above commands will install the Nginx Proxy Manager.
Configuration
Follow the below steps
- Open Nginx Proxy Manager using the VM IP address on port 81. For Example, http://(your IP address):81
- Login using below default credentials and you will be prompted to change them after you sign in. For more information refer to https://nginxproxymanager.com/guide/#quick-setup
Email:      admin@example.com
Password: changeme- Click on SSL Certificates in the top menu.
- Click on Add SSL Certificate.
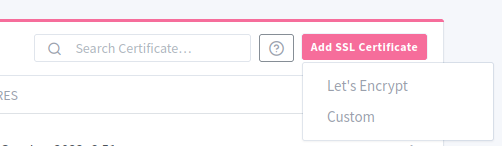
- Select Let’s Encrypt to create free CA certificate. In case if you intend to use your own CA certificate, please select Custom and upload your certificate and private key.
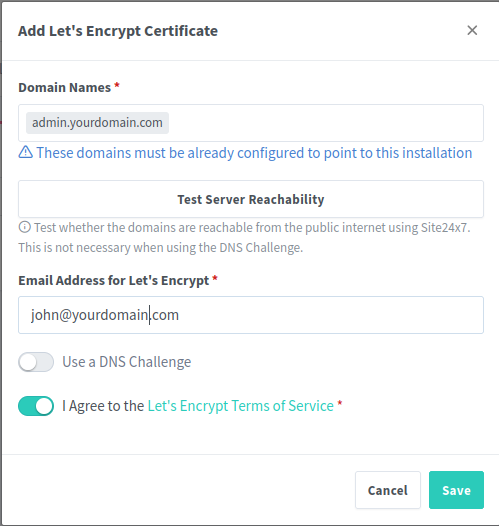
- Provide your admin console domain name and click on Save. For example, admin.yourdomain.com
- This will automatically create required certificate.
- Repeat the above steps to create another certificate for User Application domain. Example share.yourdomain.com
Once the certificates are ready, the next is to enable SSL for the domain names.
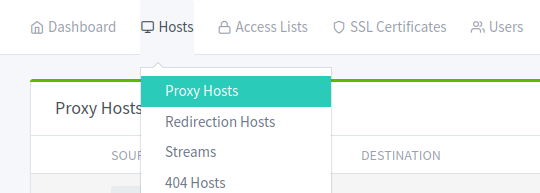
- Click on the Proxy Hosts from the Hosts Menu on the top.
- Click on Add Proxy Host at the right top corner.
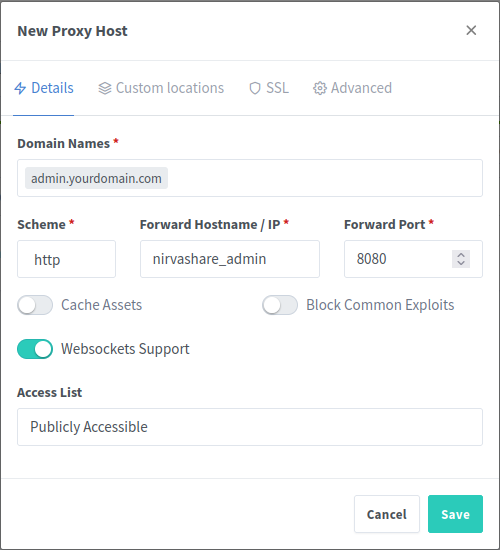
- Provide your domain name for Admin Console. For Example, admin.yourdomain.com.
- Scheme as http.
- Forward Hostname as nirvashare_admin
- Port as 8080
- Enable Websocket Support
- Click on SSL tab.
- Select the certificate for Admin Console. For example, admin.yourdomain.com
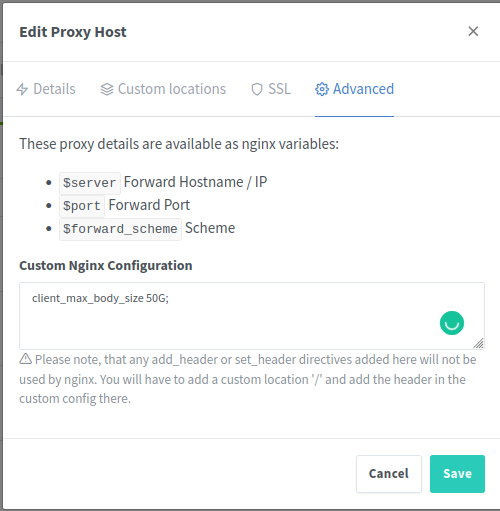
- Click on the Advanced Tab.
- Enter the value as client_max_body_size 50G.
- Above value is set to 40G which indicates the max file upload size. Please increase or decrease the size depending on your business needs.
- Save it.
Similarly create another Proxy Host for User Application with below data.
- Click on Add Proxy Host at the right top corner.
- Provide your domain name for User Application. For Example, share.yourdomain.com
- Scheme as http
- Forward Hostname as nirvashare_userapp
- Port as 8080
- Enable Websocket Support
- Click on SSL tab.
- Select the certificate for User Application. For example, share.yourdomain.com
- Click on the Advanced Tab.
- Enter the value as client_max_body_size 50G.
- Save it.
Verification
Open the Admin Console with your domain name with HTTPS. For example, https://admin.yourdomain.com
Similarly, open the User Application with your domain name with HTTPS. For example, https://share.yourdomain.com
Above URLs should open respective applications with HTTPS.
If you encounter the “Instance license limit reached” error while accessing the User Application, follow these steps mentioned HERE
Disable ports 8080 and 8081
After configuring SSL, for security reasons it is better to disable ports 8080 and 8081 from accessing it.
- In the SSH to Linux machine where NirvaShare is installed, run the command “sudo su root” to get root access.
- Edit /var/nirvashare/install-app.yml
- In the
install-app.ymlfile, locate the lines containing the port settings.
Add a#at the beginning of the line to comment out the following port-related configurations:
#    ports:
#      # Public HTTP Port:
#      - '8081:8080'

#    ports:
#      # Public HTTP Port:
#      - '8080:8080'
- While saving the file, make sure you do not add extra space or tab in other places because the file content should adhere to YAML format.
- After saving the file, restart the services using below command.
docker-compose -f /var/nirvashare/install-app.yml up -d